It’s really easy to prepare food right now; you just pull it out of the fridge or the freezer and toss the food in the microwave or skillet. Easy peasy. You have electricity for keeping your food cold, gas or electricity for cooking it, a car to get you to the store and a store to drive to if you need to buy more food. No real skills necessary.
But what if all of that went away?
There are some skills that you need to learn now for making food for survival just in case SHTF. Your methods of preservation and cooking, and even preparing daily meals will change drastically and if you’re caught unaware, you’re going to be in a world of hurt fairly quickly.
Canning
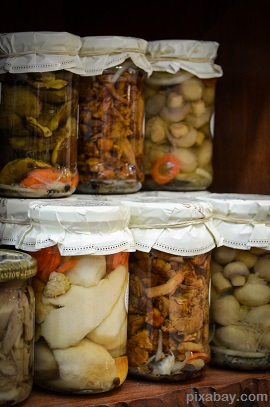
The basic concept of canning is two-fold. Heat, along with salt or vinegar are typically used as a bacterial preservative, then the canning process seals the “sterile” food into the jar so that bacteria and air can’t reach the food to instigate the spoiling process. Of course, you’re not going to add salt or vinegar to your jellies or fruits, but they’re typically used for vegetable and meat preservation.
Though you’ll can inside on a stove today, you can also do it over an open flame if needed but it will take a TON of firewood so it’s better to can it now and have it in your stockpile if you’re planning to bug in.
Some tips for canning:
Choose fruits and vegetables that are at the peak of ripeness. You don’t want any bruising or bad spots, either.
For meats and low-acid fruits and vegetables, you MUST use a pressure canner to avoid the risk of botulism. This is a wicked bacteria that affects your central nervous system. If your canned food has any bubbles in it when you look at the jar or when you open it, or if the contents blow out of the jar when you open it, DO NOT EAT IT unless you want to put yourself in a world of hurt.
Make sure that all of your equipment is thoroughly clean and free of damage. No chips, cracks or bends. Otherwise, your food won’t seal properly and you’re just wasting it.
Dehydration
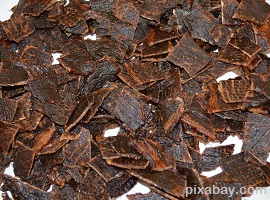
Still, dehydrated foods are lightweight and will last plenty long enough to get you through a couple of weeks without food. Some people actually combine the canning and dehydrating processes. Once they dehydrate the meat, vegetables or fruit, they then can them.
If you think about it, this is a really good idea because if SHTF, you can unseal the dehydrated food, stash it in your pack and run with it. You’ve preserved the dehydrated food so that it can later be used as a light, nutritious survival food later.
Now, we have food dehydrators but to dehydrate food in a survival situation, you can simply hang the food over a fire for several hours or even use the sun if you live in a hot enough location.
If you’re just drying herbs, you only need to hang them from a rope or string and let them dry. The same thing goes for peppers and other vegetables.
Grinding Grains
The time may come when we go back to trading agricultural products, or maybe you just have enough property to grow your own grains. In any case, you’ll need to know how to grind your own grains. You can get small hand-cranked mills or, if you only need a very small amount of something you can use a mortar and pestle.
Because home-milled flour still contains the natural oils in the seeds or nuts that you’ve used, you need to use the flour up fairly quickly because it will go rancid. It’s best to just grind what you need for a few days or a week and leave the rest in seed or nut form.
Measurements
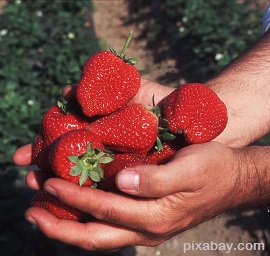
Your cupped palm holds about 1/4 cup. A dime-sized pile of salt in the well of your cupped hand is about 1/4 teaspoon, a nickel-sized mound is about 1/2 teaspoon and a quarter-sized pile is about 1 teaspoon.
Liquids can be a bit trickier; it’s best at this point to use percentages versus measurements until you can adapt your new life to a new measuring device. Of course, you can always use something that you know the measurement of such as a gallon jug, a 16oz glass or a 20oz water bottle.
The thing to remember when guessing at measurements is that it’s always possible to add more; it’s not usually so easy to remove something once it’s added.
What to Beware when Making Food for Survival
- Don’t take short cuts, and use only clean water. Foodborne illness is not something that you want to deal with when you may not have access to medications or hospitals.
- Clean your area thoroughly if you’re cooking in a survival situation. Use bleach, especially when cleaning up after using meat.
- Always wash your hands before you begin cooking and between handling raw meat and any other food product.
- Use the reusable canning lids. That way, you’ll be able to continue canning food even if you don’t have access to a store to buy more lids.
Cooking and preserving food is going to be much more complicated if SHTF and you don’t have access to electric, gas, stores and modern conveniences. Your main priority is going to be sanitation because you don’t want to make yourself or your family sick.
After that, many of the processes are going to be the same; you’re just going to need to use different methods.
I’m sure that I’ve missed some important skills needed to make food for survival, so please share your tips and advice in the comments section below!
Interested in becoming self-sufficient? CLICK HERE to get our best-seller on food preparedness!
This article has been written by Theresa Crouse for Survivopedia.




Pingback:5 Basic Skills You Need To Make Survival Food - Survivalot | September 22, 2015
|
Robert Wills | September 22, 2015
|
My wife and I have been canning and drying since 1978. We grow most of our vegetables and several kinds of fruit, pressure canning around 90 jars per year, and 50% of our meat is deer meat. Growing herbs and spices does not take up much room and they dry well in just the warm summer air. I put the dried herbs in jars and they too last for years, if protected from moisture. I put the dried fruits in a freezer so they will last longer, and I freeze things that we will eat in the next few months. While we have electricity, I might as well use it, but am always aware that preserved foods are the best bet in the long term. We recently ate some jelly and pickles that we canned in 2005, ten years ago, and they were nearly as good as when we canned them. I recently had to prepare food for a large number of people and used several jars of green beans that were 3 years old–the last ones canned in 2013. They were fine and tasty. I usually eat the food from the year before, saving the food we can this year for the next. That way I always have a year’s supply of canned vegetables and fruits available for a crisis. Our first pressure canner lasted from 1978 until 2011, when we purchased a new one. This year we purchased a backup canner. I have two camp stoves and enough propane to use for cooking and canning for some time over a year. After that it will be the large fire place that will have to be used. That will be a little more difficult, but I have a supply of charcoal that might be helpful.
You might also suggest that people keep a 2 year supply of heritage seeds that will reproduce themselves. Planting fruit trees is also helpful, although it takes several years before one gets to harvest the fruit. You have to think ahead.
Pingback:5 Basic Skills You Need To Make Survival Food | Bsn Global News | September 23, 2015
|
Pingback:5 Basic Skills You Need To Make Survival Food | TheSurvivalPlaceBlog | September 23, 2015
|
Dr. Clifford N. Alford | September 28, 2015
|
Real pemmican, not the cheap crap called that in stores today, is made from crushed dried fruits, nuts, berries, vegetables and meats, fish or fowl, and all of that is mixed with tallow. To this you add five juniper berries per pound, place it ina parfleche of cloth bag, and hang it from the rafters. Thanks to the juniper berries, which are also a digestive aid, this mixture will last for about 20 years. Just dig out a handful when you are hungry, or put it into some boiling water for a quick and nourishing soup or stew. That is an excellent traditional Cherokee winter meal, and it’s great to take hiking and hunting as well.
shirley | September 30, 2015
|
where can I find the reusable canning lids
Pingback:5 Basic Skills You Need To Make Survival Food | October 6, 2015
|
Pingback:Survival Foods To Stockpile For Diabetics - Survival By Preparedness | October 14, 2015
|
Pingback:6 Basic Recipes To Prepare Off-Grid - Survival By Preparedness | October 19, 2015
|
Pingback:How To Dry Can Food For Survival | Prepper's Survival Homestead | June 6, 2016
|
Pingback:Healthy Low Carb Foods To Stockpile For Survival | Survivopedia | June 27, 2016
|
Pingback:Secrets Of Dehydrating Fruits for Long-Term Storage | Survivopedia | September 2, 2016
|
Pingback:How To Dry Can Food For Survival | Survivopedia | March 18, 2019
|