


A while back, I started dehydrating various foods since I needed snacks for my camping trips, and it was cheaper to make my own rather than buying them from “specialized” stores. I decided to buy a food dehydrator and began drying various foods to add diversity to my diet but also to reduce the weight of my backpack.
This was long before I started prepping, and once I got into this lifestyle, I realized that dehydration is a great way to preserve food long-term and is quite ideal for my prepping needs. Furthermore, I had the chance to experiment with various foods, including wild edibles. I cannot see myself living without such an appliance since it provides many benefits and makes food preservation much easier.
I learned a lot over the years and decided to share my tips with Survivopedia’s readers since not everyone is a food preservation expert. So, let’s get into it!

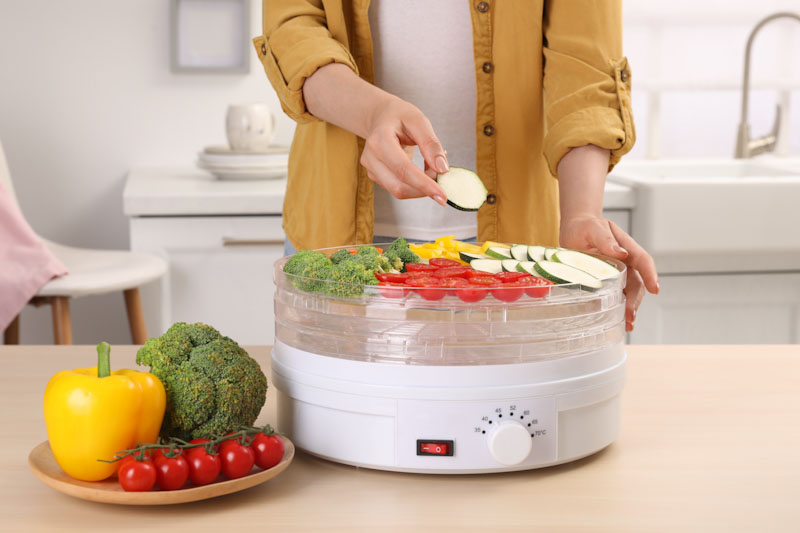
Know your food dehydrator
In the last decade, I’ve owned three food dehydrators, and one thing I’ve learned is that you should really spend the time to read the owner’s manual and any additional instructions the appliance provides. Some folks apply the trial-and-error method when buying new things and don’t bother reading the manuals. They believe that once they’ve learned to operate one device, the same rules apply to all similar devices.
Sure, reading manuals can be boring, but it will save you a lot of headaches, especially when food is involved. I’m the type of person who doesn’t like to see food go to waste, so I check everything when handling food.
Don’t mix foods
Whenever I had leftovers of various foods from a batch I had just dried, I often grouped foods of different types together, not knowing that it would alter the taste of the food. For example, if you dry peppers with any other type of food group, you will end up with spicy foods. Drying strong-smelling vegetables with fruits is also a no-no, and you will just end up with foods smelling and tasting weird.
It may take longer to dry leftovers of a grouped food, and you might not have all trays full, but at least you will have food that tastes the way it should.
Learn about blanching
Blanching is the process of scalding vegetables in boiling water for a short time and then quickly and thoroughly cooling the vegetables in icy cold water. This process stops the action of food enzymes and prevents the loss of flavor, color, and texture. In general, all vegetables should be blanched before dehydrating, with few exceptions such as peppers, cut onions, green onions, and leeks.
Skipping this step can cause the vegetables to lose their color and turn dull or brownish during dehydration and storage, making them less appealing when consumed as is or added to additional dishes. Non-blanched vegetables can also become tough and harder to rehydrate, resulting in a less desirable texture when cooked.
Slice the foods or dice them evenly
To ensure fruits and vegetables dry evenly, you need to cut or dice them into similar-sized pieces. This can be quite challenging using an average kitchen knife, especially if you’re not used to cooking often. To ensure you do a good job, I recommend getting some slicers and dicers, as there are various products available online. They are practical, easy to use, and quite affordable.
Don’t overlap foods
Do not overlap foods, as this will block airflow and prevent proper drying. Additionally, you could contaminate or alter the taste of foods, especially if you use similar food groups in one batch, such as drying Granny Smith apples with Golden Delicious varieties.
“Only dehydrate the best quality produce”
I’ve heard about this one way too many times, and no, you are allowed to dry whatever produce you have available and all your garden surplus, regardless of quality or ripeness. There are, however, a few tricks to ensure you end up with a great batch of dried goods. As mentioned earlier, make sure you cut food items evenly and mainly select the firm parts for drying. If you have overripe produce, you can turn it into puree and dry it. Some food dehydrators even have a puree tray accessory.
Berries and grapes are often a challenge
Berries and grapes are types of fruits that are difficult to dry because they have uneven shapes and sizes. In some cases, you will need to rotate the trays in the dehydrator to ensure everything dries evenly. Also, since some of these fruits can be large, it’s recommended to cut them in half. Alternatively, you can turn them into puree. Make sure to check the berries often since the smaller ones can easily be overdried.
Don’t be afraid to dry wild edibles
I’m a forager, and I like to pick wild delicacies whenever I find myself in the wilderness. Depending on the season, you can harvest various fruits and vegetables that can be easily dried, just like their domestic counterparts. The problem with wild edibles is that you won’t find information about their drying requirements in your dehydrator manual, and you need to do a little bit of research yourself. The best source of information remains YouTube, as well as various blogs and websites owned by foragers and homesteaders.
For example, I like to pick medicinal herbs and dry them for tea and other concoctions. I have no trouble drying leaves and stems, but with the roots, it’s a totally different story. The roots must be cleaned properly and also cut evenly to ensure thorough drying. If some pieces are still wet when you store them, you will compromise your entire stock.
Ventilate the working area often if you dry spicy items
I like to dehydrate cut and diced onions, but also peppers and garlic. When I do so, I ventilate the area properly since the oils in some of these vegetables will become airborne and irritate my eyes. Also, once you are done drying these types of foods, you need to properly clean the dehydrator; otherwise, your next batch of food will become spicy. There will be a need for a lot of scrubbing to make sure your banana chips are not spicy.
Keep your dehydrator clean at all times
Cleanliness is actually more complicated and time-consuming than the food drying process itself, since if you do a poor job, you will end up with a dirty (even moldy) dehydrator and contaminate your food.
I also like to dry cooked meals, and I’ve experimented with various meals over the years, since nothing beats a home-cooked meal when you’re camping alone in the middle of nowhere. That being said, I’ve dehydrated pasta dishes, chili and stews, casseroles, and various grain-based dishes. This can sometimes become a messy job, and cleaning requires a lot of time and patience. I had to throw out a dehydrator since my wife didn’t do a good enough job after dehydrating some leftovers. It was full of mold, and there was no point in trying to salvage it.
Here is a list of the most common cooked-meals that folks like to dehydrate:
Soups and Stews: These are ideal for dehydration because they dehydrate well and rehydrate quickly, retaining much of their original flavor and texture. Common choices include vegetable soup, beef stew, and chicken noodle soup.
Chili: Chili is a favorite for dehydration due to its hearty ingredients and robust flavors. It rehydrates easily and is perfect for a warming meal on the go.
Pasta Dishes: Pasta with various sauces, such as spaghetti Bolognese, macaroni and cheese, or pasta primavera, can be dehydrated. The key is to ensure the pasta is cooked al dente before dehydration to avoid mushiness upon rehydration.
Casseroles: Casseroles, like lasagna or tuna casserole, can be dehydrated in portions. These meals are typically dense and flavorful, making them suitable for rehydration.
Rice and Grain-Based Dishes: Meals like fried rice, risotto, and quinoa dishes dehydrate well. They are versatile and can be combined with a variety of vegetables and proteins.
Curries and Stir-Fries: Curries (like chicken curry or vegetable curry) and stir-fries (like beef and broccoli) are commonly dehydrated. These meals are packed with flavor and rehydrate well.
Breakfast Dishes: Breakfast items such as scrambled eggs, oatmeal, and breakfast burritos can also be dehydrated. These provide a convenient and nutritious start to the day when rehydrated.

Store your dehydrated foods properly
Storage is also a task that requires your full attention, especially if you’re new at dehydrating foods. You should store dehydrated foods in heavy-duty zippered bags or in metal containers. Also, if you have glass jars lying around, you can also use these for storing your dry goods as long as you sterilize them beforehand and check to see if the caps provide a good seal. I also recommend throwing a food-grade silica gel packet in each container, especially if you’re a beginner just discovering the art of drying food.
A last word
I hope these tips will help you improve your food dehydration practice, allowing you to increase the size of your dried goods food storage. I wish someone would have told me about some of these when I started, and that’s the main reason I’ve shared them with you. As always, please use the comment section if you have any additional tips you feel our readers will find useful.
Others Are Watching Now:


I use two methods of storing dehydrated foods; Mason jars and Foodsaver bags. I put the dried items in Mason jars, put the lids on, and used the Foodsaver jar accessory to evacuate most of the air from the jar. Then I put the ring on and store it in “a cool dark place.” If I use the Foodsaver bags I only apply enough vacuum to remove most of the air from the bag, but not enough to start compressing the food. I don’t run the sealer until it stops itself. If you do that, you’ll end up with a solid block of whatever you dehydrated. With either method I put an oxygen absorber in the container to keep the contents from discoloring over time. Personally, I prefer the Mason jars. They’re reusable, including the lids. I only use the Foodsaver bags if I don’t have jars or lids available, as they’re expensive.
Heck I have a freeze dryer …
I dehydrate a lot these days. As i have too many empty mason jars, I use that for storage. Every mason jar, large or small is vacuum sealed.. I’ll use canning or freezing for excess meal storage.
Tom MacGyver, Excellent comment! I add a few concepts.
Comparing to freeze drying which is expensive, power hungry and not conducive to continuing in the harsh times to come, I’ve come to preferring simply drying and it can even be done alternatively with solar and even fire providing the heat in future times of no utilities. Sure, my many preparedness friends who freeze dry love it particularly for keeping the shape and texture of foods to reconstitute to be most like fresh foods. But, in opposite and sharp contrast from my preparedness perspective, I view that “great advantage” as an impediment to more important preparedness food storage considerations particularly when I combine it with essentially the same as your canning jar with Food Saver adapter except I’m much more extreme with removing the air by instead using an industrial high-vacuum pump for a very significant difference since it further reduces the moisture content from the typical 10% to zero. That greatly extends shelf life. Unlike the “advantage” mentioned of freeze drying, I go the opposite direction by putting practicality ahead of retaining a desired texture. Instead, my criteria is I want each canning jar to contain several times more food as I see the unnecessary luxury of retained texture as greatly limiting how much food the jars can store. Instead of freeze dried strawberry slices that look great, I view that as storing fluff compared to turning the strawberries (or other fruit or vegetable or meat) into a powder and packing in many times more food into the jars. That’s more economical and compact compared to needing to afford much more jars with further considerations of the space they occupy which matters even more when they need to be transported and to not run out of food by having the food densely packed into the jars. That’s so much more important than natural texture that I forgo it in favor of more food and even though it reconstitutes to a puree instead of a meal that can look like it was prepared by a chef in a fancy restaurant, it still has the same flavor and nutrition. Consider NASA feeds astronauts paste squeezed out of a tube instead of a conventional plate of food with normal textures. When preparing for survival, I put effectiveness ahead of unnecessary luxury and I’m willing to adapt to change rather than waste efforts on maintaining unnecessary normalcy since it is fantasy to attempt to make the harsh times to come like normal. Adaptation is the universal key to survival and always has been everywhere for everything (man, animal or plant) and always will be).
[email protected]
I agree with Ronald learn to ada that hard to do pt to whats happening no electricity how do you use a freeze drier smoking is not all that hard to do and there is always salt cureing