As a gun owner, you will enjoy many rewards that come with being a responsible and competent carrier. Practicing effective and efficient shooting skills reduces the risk of injuring innocent people and also makes it easier for you to handle a crisis.
Gun owners today must practice many different scenarios, including when and when not to shoot until it become second nature or muscle memory.
When you have developed a sufficient level of muscle memory, you will have to think consciously about drawing your gun, aiming, or firing. Rather, once you know that you have to fire the gun, it will all happen in one fluid motion from start to finish.
From that perspective, practicing isn’t just about ensuring you can hit the target, it is about being able to evaluate and follow through as quickly as possible without making mistakes. Even though professional shooters make their actions look effortless, hours and years of practice go into their skills and marksmanship.
Here are some ways you can hone your skills at home using some basic devices and drills.
The LaserLyte Training System
LaserLyte makes training kits that use a colored polymer pistol or revolver that looks and feels just like a handgun that you plan to carry. Instead of firing live ammunition, this gun fires a safe laser beam that will show up on the target. These kits can be used for drawing from concealment, target practice, or gallery shooting.
Types of training kits available (each contains your handgun replica of choice):
- Laser Quick Tyme Kit – The bulls eye target in this kit has a built-in timer that can be used in the on or off mode depending what your shooting requirements are.
- Laser Steel Tyme Kit – contains two steel Tyme targets that make a metallic sound when you hit them.
- Laser Rumble Tyme Kit – contains two can shaped laser targets that spin and make a rumbling sound when you hit them.
- The laser Gallery Kit – contains one bulls eye target, one steel tyme target, and one rumbling can target.
Once you have mastered stationary shooting, you can adapt the system for shooting at moving targets. Did you know that you can use a Roomba vacuum cleaner, remote control truck, or other robotic devices to improve your shooting skills? Just put a laser target on top of it, pick a location to shoot from, and let the Roomba run around the room.
You can practice concealment, and use all different kinds of furniture for your drills. This includes shooting down from staircases, or other locations at head level or other heights of interest to you.
When you use the Roomba vacuum cleaner, you can be as creative as you like formulating drills. Since the Roomba’s activities can be quite random depending on how your furniture is arranged, you will also get to work a little bit on adrenalin control.
If there is a large barn or other large storage builds on the property, try using a drone to carry a laser target. With a good drone pilot, it is possible to make the target shooting training session into a custom training course for shooters.
With this type of target practice, you can work up from slow moving to faster ones, plus include plenty of variety. Or, if you need to work on your form, drill on the same patterns as much as you like.
Airsoft Pistols
Airsoft pistols are replica handguns that fire a plastic BBs. These pistols are designed after the most popular pistols of today to the point they are exact replicas, except there is a a RED ring on the barrel at the muzzle end.
You can shoot Airsoft guns in the house, garage, or outdoors. You will also find that Airsoft BBs are much cheaper than ammo you have set aside for practice at the range. To keep from losing the BBs either indoors or outside, I would recommend using a BB trap or a tarp behind the targets.
These pistols are fired either by spring action, automatic electric guns, or by gas.
Spring Action
Supplies you will need to shoot.
- Ammunition- 6mm pellets.
- Targets- shooters choice.
- Eye protection- shooters choice.
These are the cheapest and lowest velocity of the Airsoft pistols. To fire this pistol, you must:
- Load the ammunition reservoir.
- Pull back the slide or cocking lever back until the spring is all the way back and locked.
- Aim and pull the trigger. When the trigger is pulled, it releases a piston that shoots forward through a cylinder at high speed and pressure. It is this pressure that pushes the BB out of the barrel.
Note: These pistols are very slow and must be cocked every time in to be fired. I would not recommend using them to shoot in semi-auto pistol practice.
Automatic Electric Guns (AEGs)
This firing system is good for automatic firing rifles or semi-auto pistols. These weapons use a small rechargeable battery to run a small electric motor. This motor runs the sequencing gears, and operates the piston travel.
Supplies you will need to shoot:
- Ammunition- 6mm pellets.
- Targets- shooters choice.
- Eye protection- shooters choice.
How the pistol operates when fired.
- When the trigger is pulled, the electric motor activates, turning the piston gears, which pulls the piston back and loads the pistol.
- Releases the piston to pressurize the cylinder.
- Fires the BB down the barrel.
- The trigger resets for the next shot.
Notes: Be sure the battery is fully charged and the BB reservoir is full. Some of these pistols can simulate the recoil of the fired pistols.
Gas Blow-Back (GBB)
These Airsoft pistols use a compressed gas system to shoot the BBs out of the barrel. Many of these pistols have a gas blow-back feature that causes the slide on the pistol to slide backwards and return after being fired. These gas blow-back pistols are the closest of the three types of Airsoft pistols that feel like firing a real gun.
Supplies needed to shoot:
- Ammunition- 6mm plastic pellets. Don’t be cheap, buy a good quality one without seams or cracks. Low quality pellets can damage the pistol.
- Targets- Shooters choice.
- Gas- There are three types of gas that can be used in the pistol. CO2, Propane, or Green gas (Propane gas that has silicone mixed in to self-lubricate the pistol.) If you use CO2, Propane or Green gas in cylinders a special converter will be needed to fill the magazine with the gas.
- Eye protection- Shooters choice.
When the trigger is pulled, the gas activates, which pulls the piston back and loads the pistol, pressurizes the cylinder, fires the BB down the barrel and the trigger resets for the next shot.
Safety and Shooting Features of a Good Range
In order to get the most out of shooting at home, build a range where you can practice safely and without distraction, but keep the safety in mind. Here are a few things you can do to ensure your range is as safe as possible:
- Build the range facing away from occupied dwellings.
- Have a well-built back stop and barricade side walls that will stop all ammunition that will be used on the range.
- Remove anything that might cause ricochets on the range.
- Target stands to hold paper or steel gong targets.
- Motor or hand operated moving targets.
Types of Shooting on Your Outdoor Range
Paintball
Paintball is a sport in which players compete in teams or individually to eliminate opponents by tagging them with paintballs fired from a paintball gun. These games can involve role playing and be carried out in many kinds of terrain.
Paintball sports give your hands-on training at “shooting” someone without using ammo that can wound or kill. It also gives you a chance to work on strategies and hone your skills while addressing adrenaline related matters.
Like all shooting sports, when using paintball guns, the competitors need to know the capabilities of their guns and what safety gear is necessary to protect them. The following is the basic equipment needed when using paintball guns.
- A paintball gun kit of choice.
- Paintballs will be the shooters choice.
- Protective clothing
- Chest protectors that are full wrap around to protect front, back, and sides.
- Elbow and forearm pads.
- Helmets or head wraps.
- Goggles for eye protection.
- Knee and shin pads.
- Neck protectors.
- Groin cup.
- Gloves for your hands.
For players outer clothing:
- Some individuals like to wear camo pants and shirts to better blend in with surrounding terrain.
- Full body Ghillie suit for total camouflage.
- Boots of your choice.
Live Fire- FBI Q Course
When I was a police officer, my department used the FBI “Q” course for pistol qualifications. This is a sixty round timed course that all FBI Agents must pass to complete the requirements to become an agent. It has since been adopted by many other departments at the national, state, and local levels. This course is not difficult, but it’s a good indicator of the shooters abilities.
Your minimum passing score will be fifty out of sixty in the center squares only in a certain amount of time. Anything outside of this square is counted as a miss. The time requirements give you enough time to shoot each section of the course. The shorter time limits are designed to add a little stress and to give you a baseline to keep from shooting too slowly.
Never forget that a gunfight is fast and very violent. The faster you can shoot accurately, the better chance you have of coming out alive.
Course of fire
Starting at the 3-yard line. You will need a magazine loaded with 12 rounds total. Re-holster after each part except number 3. Don’t re-holster between strong hand and weak hand portions.
- Time limit 3 seconds. Draw and fire 3 rounds with your strong hand only.
- Repeat 1.
- Time limit 8 seconds. Draw and fire 3 rounds with your strong hand only. Then switch hands and fire 3 rounds with weak hand only.
- Re-holster an empty pistol.
Move to the 5-yard line. You will need 12 rounds total. Two handed shooting is required from this point on.
- There will be 4 repetitions of 3 seconds each. Draw and fire 3 rounds each. Re-holster after each 3 rounds portion.
- After the fourth-round re-holster an empty pistol.
Move to the 7-yard line. You will need 16 total rounds. 12 rounds in the first magazine in the pistol. 4 rounds in the reload magazine.
- Time limit 4 seconds. Draw and fire 4 rounds. Re-holster pistol.
- Repeat 1. Re-holster pistol.
- Time limit 8 seconds. Draw and fire 4 rounds (the gun is empty). Reload, fire 4 rounds.
- Re-holster an empty pistol.
Move to the 15-yard line. You will need 10 rounds.
- Time limit 6 seconds. Draw and fire 3 rounds.
- Repeat 1.
- Time limit 8 seconds. Draw and fire 4 rounds.
- Re-holster an empty pistol.
Move to the 25-yard line (barricade shooting).
- Time limit 15 seconds. You will need 5 rounds.
- Draw and fire strong hand barricade.
- Re-holster empty pistol.
Time limit 15 seconds. You will need 5 rounds.
- Draw and fire weak hand barricade.
- Re-holster empty pistol.
Build and practice in a Hogan’s Alley shooting range
Hogan’s Alley is any shooting range devoted to tactical shooting. These ranges are best known for teaching shooters when to shoot and when not to shoot. This is better known as Shoot Don’t Shoot Drills.
They can be very sophisticated with remote control target systems or as primitive as targets mounted on a wheeled carriage pulled along by ropes operated manually.
The Hogan’s Alley range is built to look like an average US small town or city street. Pop up targets can be used singly or in groups set at different ranges.
Video first seen on KRHAAS.
Remember to have a good mix of good guy and bad guy targets to keep the exercises interesting. When used in a Hogan’s Alley, set up pop-up targets to appear in windows, doorways, or looking over objects like cars, boats, or walls.
To keep the drills from getting boring, move the targets around to make different scenarios.
Gallery Range
The Gallery range can help the shooter to shoot different types of targets at different ranges. You can use tin cans, aluminum drink cans, or plastic bottles. These targets can be placed on a stump, suspended from frames or tree limbs, or just thrown into the target area at different distances from the firing line.
When the targets are different distances. This helps you judge distances better, hit the targets more often, and teaches you how much hold-over to use at different distances. When you can keep the targets dancing and bouncing with multiple hits, you will be well on your way to mastering this type of shooting.
When finished shooting for the day always go over the shooting area and take the brass and trash with you.
Wooden Target Stands
These target stands can be used to mount different types of paper targets at different distances from the shooting line. This is an excellent way to shoot a bull’s eye target or a “shoot don’t shoot” course of fire.
Auto-popper Steel Targets
These are steel targets that use springs to return hit targets to the upright shooting position. The targets come in many sizes of circles and animal shapes. The steel targets should be placed at different distances from the firing line and off known distances that are used regularly.
Ground Strike Targets
There are ground strike targets that are made of durable materials that can take hundreds of shots before being shot apart. They come in ball, animal, and jack shapes. When you are shooting on your range:
- Learn to shoot from the standing, kneeling, sitting, or prone positions at different distances from 3-25 yards from the target or further.
- Learn to shoot both strong and weak handed.
- Learn to shoot from behind barricades.
- Practice drawing, shooting, and reloading from each of the four positions.
Recording Your Sessions
When you are practicing at home and away from an instructor, you may not realize that you are making mistakes in both shooting form and other maneuvers.
Using a video recorder for your sessions will make it possible for you to compare your form, and discover mistakes that might otherwise prove fatal in an actual shootout.
While you may feel uncomfortable with video cameras at first, they are well worth what they will show you.
As a first time gun owner, it is very important to get the proper training. A gun is an excellent tool for self defense, and can also be used for sport and hunting.
If you don’t practice, even the best gun won’t make up for lack of experience and skill in shooting and evaluating targets. Practicing at home can give you cheaper alternatives, and also give you more time and privacy to work on your abilities and develop your survival mindset and skills.
This article has been written by Fred Tyrell for Survivopedia.



bill in idaho | August 7, 2017
|
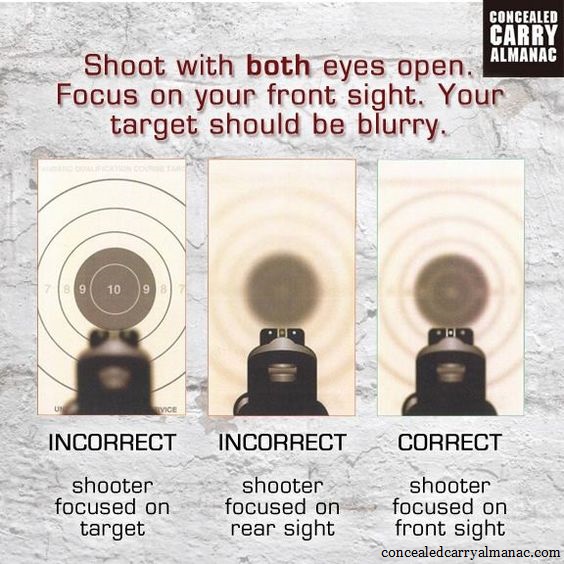
Hey, Fred ! good stuff ! I am a firearms instructor of 35 + years. Just some pointers that i consider e s s e n t i a l ! 1.) begin with a .38 spcl (revolver – 4″ -6″ bbl) or a 9mm (slide action semi-auto). 2.) pick one range/ distance for hot firing (i recommend 7 yds – 21ft.) and stick to only that one. 3.) use the cheap ammo (no +p s). 4.) “dry-fire” practice – full draw and fire 25 times (minimum) every day (365 days a yr). 5.) practice both 2 handed and strong hand (1 hand) stance to begin with. 6.) develop with careful attention your “2 eye” open, front sight focus, elbow(s) bent, follow-up, feet shoulder width separation, and 180 deg. clear l/r s.a. continue with steady practice and you w i l l succeed !!! bill
Pingback:Survival Defense: How To Build Wooden Targets For Shooting Drills | Survivopedia | August 17, 2017
|
gary p modzel | August 21, 2017
|
Very beneficial information. Thanks for making it available and sharing your knowledge and experience.
Fred | August 10, 2019
|
Hello Bill,
What is best way to sight align shotgun (clay,skeet, bird) with left eye dominant?
What about Rifle Scope?
Thanks