We all love them – those delicious herbs and spices that takes food from bland to grand, but what happens when you can’t just run to the local grocery store and buy them? If SHTF, it won’t take long for you to run out of your store-bought goods, so why not learn now how to make your own?
There are several different benefits to making your own seasonings. First, most of the stuff that you buy in the store is likely old. There’s no telling how long it’s been sitting in some warehouse, just to be transported to a store where it may sit for many more months.
{adinserter backyardliberty}Second, if you’re growing your own herbs and making your own seasonings, you know what’s in them. You know that you’re not seasoning your spaghetti sauce with pesticide along with basil and oregano.
Finally, if stuff really does go south, you’ll be able to make seasonings for your family and to use as barter for other things that you need. Making seasoning blends isn’t brain surgery but can you name off the ingredients in seasoning salt off the top of your head right now? Probably not, and neither can most people, but you’re about to learn.
Most seasonings consist of a few basic herbs and spices that taste differently when you combine them in different ways and amounts. I recommend that you grow, at minimum, the following herbs and spices:
- Basil
- Parsley
- Oregano
- Cilantro (if you let the plant flower and develop seeds, the seeds are coriander)
- Mint
- Rosemary
- Thyme
- Chives
- Tarragon
- Sage
- Dill
- Marjoram
- Garlic
- Chili Peppers
- Ginger
- Turmeric
- Cumin
The reason that I recommend these is that if you have just these combinations, you can make just about any seasoning blend that you could ever desire. Cinnamon is also something that you should keep on hand. Since you probably can’t grow it, you’ll need to buy it in dry goods and store it.
There’s more than just flavor behind the logic in suggesting these particular herbs. Almost all of them have healing or medicinal properties too.
How to Grow Your Herbs
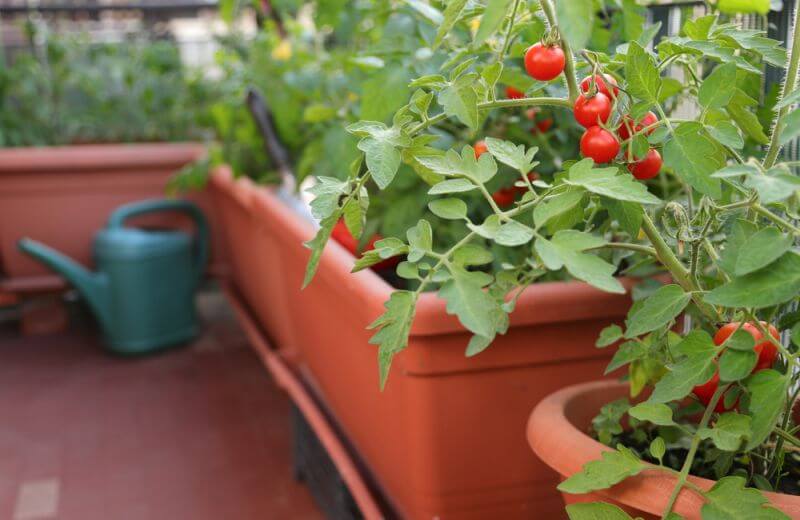
Most of these herbs can be started from seeds and grown in planters or in your garden, though planters are easier to tend. Basil, marjoram, oregano, rosemary, thyme, parsley, tarragon, sage, chives, dill and cilantro all grow well just by burying the seeds about ½ inch deep in a planter and watering them regularly to keep the soil moist.
All of these plants are ready to eat pretty much as soon as they start to grow leaves but don’t get too anxious; wait until they’re fully grown to harvest or you’ll just lose the opportunity to have a more plentiful harvest.
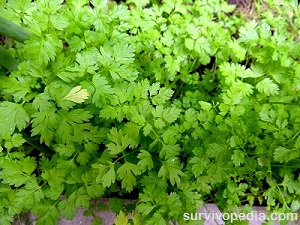
When it’s time to harvest them, you can either use them fresh or dry them by hanging them until they’re completely dry and then sealing in an airtight container.
Growing and Harvesting Garlic
Garlic is planted via a bulb that has sprouted. You simply bury the bulb about 2 inches down and watch it grow.
Though it’s a bit tricky to know when to harvest garlic, a good rule of thumb is to wait until about half of the leaves have drooped and turned yellow. Gently push some of the dirt away from the bulb and if it looks to be of good size and the paper wrapper is firm and tight, it’s done. If it’s still small, cover it back up and check it again in a week or so.
Brush off the excess dirt and trim off the greens but if you want to store your garlic for winter or just for a longer period of time, don’t wash the bulbs.
Growing and Harvesting Ginger
Most people don’t grow ginger and I suspect that’s because they think of it as an exotic root and just don’t think that they can do it. That couldn’t be further from the truth. You can grow ginger indoors or out, though it does like warm, humid climates best if you’re growing it outdoors.
One of the best things about ginger is that it doesn’t require much tending. As a matter of fact, if you grow it outside, you can pretty much plant it and forget it until it’s time to harvest as long as you live in fairly humid and moist conditions. It loves filtered sunlight, a sheltered spot and warm weather along with the humidity and rich soil.
Now it’s time to dispel the myth about the edible part of ginger being a root; it’s actually a called a rhizome and is part of the plant stem that grows horizontally underneath the dirt. It holds the nutrients for the plant and is similar to a tuber (potato) but not exactly the same thing. A rhizome has roots of its own.
You can start your ginger by buying some ginger root at the store, soaking it overnight and planting it directly into the dirt. One of the reasons that you want to soak it is because it may have been treated with growth retardant to keep it from growing buds.
When you’re buying ginger to plant, look for pieces that have little nobs that are similar to the eyes of potatoes. Plant it in good, rich soil. Compost is perfect for it. It should be soil that stays moist but drains well so that the ginger doesn’t become waterlogged.
If you want, you can cut the root into pieces that each have a few “eyes” or you can just plant the whole thing. If you’re planting them outside, plant them about 6 inches apart. If you’re growing them in a pot, you can put about 3 pieces in a 14 inch pot then wait for it to grow.
At first you’ll only get a few leaves but as it grows, it will get fuller but ginger only grows 2 or 3 feet high. Plant in late winter/early spring or if you’re in the tropics, plant it at the end of the dry season/beginning of the wet season.
Water ginger enough to keep the soil moist; mulch is great to use in the soil around it because it keeps the soil moist and nourishes the ginger as it decomposes. When your plants start to die back in the fall (this usually takes 8-10 months!), stop watering it for about a week and then harvest your ginger!
If you really want to get a good crop going, resist harvesting at least a few of your plants for a year or two. To regrow ginger, either save some of the rhizome for the following planting season or just leave some in the ground. You can also just harvest some rhizomes from around the edge of the plant and leave the rest.
If you live in a colder climate, you may do better to grow your ginger in raised beds, in a greenhouse or inside.
Growing turmeric is an extremely similar process though it may be harder to find the rhizomes. Just look around and you may be able to find them at some specialty stores. Turmeric likes sunny areas but afternoon sun is OK.
Drying Your Cayenne and Chili Peppers
Growing chili peppers is just like growing any other pepper but drying it is skill that you may not have acquired yet.
It’s fairly easy to do; you can, of course, just dry them in your dehydrator or oven but if SHTF, that may not be an option.
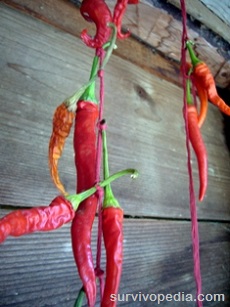
To dry peppers it the old fashioned way, wash them well and allow them to dry thoroughly. Run a string or twine or dental floss through the stems of the peppers, leaving a bit of space in between each one, then hang them in a sunny spot and let them dry until they’re leathery and shriveled. This will take a week or two.
How to Grow Cumin
Cumin is another plant that many people don’t grow. You need to start it inside 4-8 weeks before the last frost because it has about a 120-day growth period from planting to harvesting. Plant the seedlings about 6-8 inches apart. Though they prefer a loamy or sandy loamy soil, they grow fairly well in any rich soil that is moist but well drained.
When the seed pods turn brown, it’s time to harvest them. Simply rub the pods to remove the seeds. Use immediately or store in an airtight container before or after grinding to a powder.
Spice Recipes
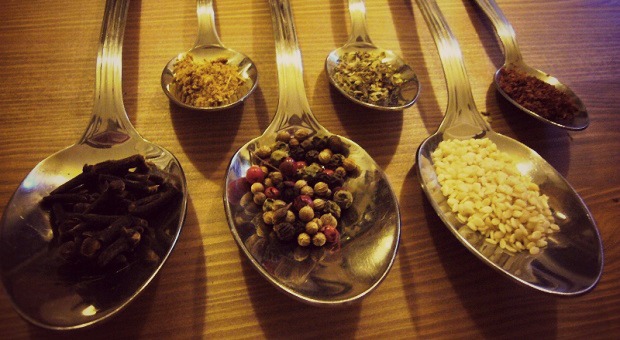
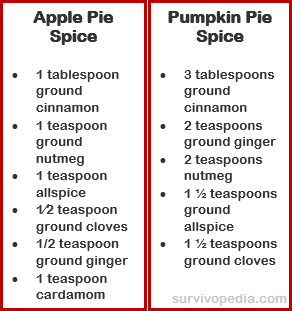
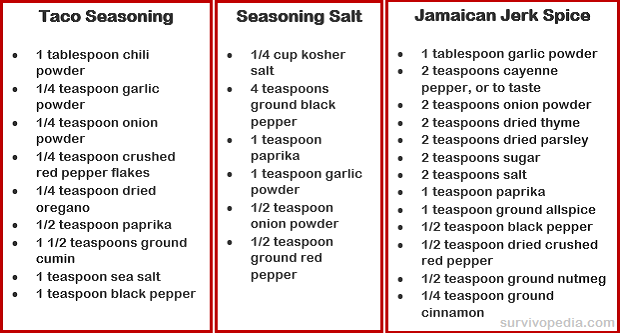
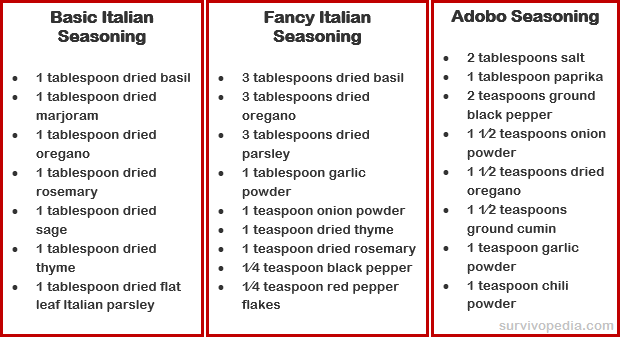
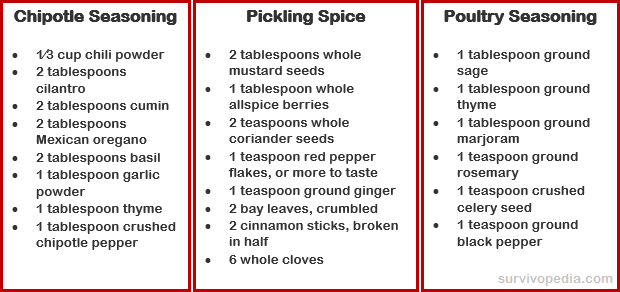
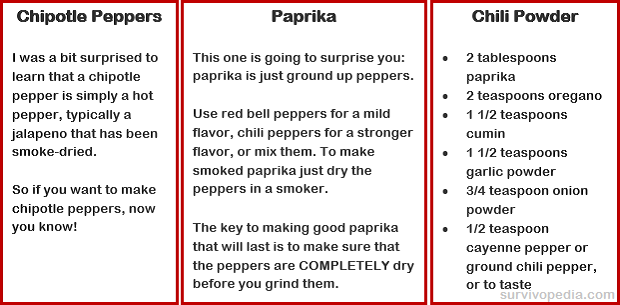
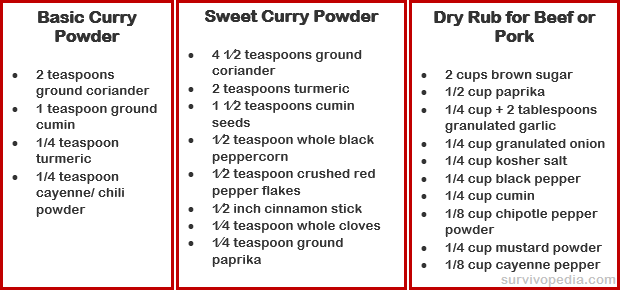
OK, now that you know how to grow your herbs and spices, let’s get to the good part: the recipes for spice blends. You can see most of them in the pictures above, and here are 3 other seasoning recipes that I’m sure you’ll love.
As you can see, there are a few ingredients such as allspice, cardamom, cloves and nutmeg that you simply can’t grow in the US so you need to stockpile these items so that you have what you need.
These are just a few basic recipes that will help get your juices flowing. If you have more to share, please do so in the comments section below! We can all learn from each other.
This article has been written by Theresa Crouse for Survivopedia.





Pingback:Hardtack: A Simple DIY Survival Food From History | | disasterdefense.us | June 10, 2016
|
Pingback:Hardtack: A Simple DIY Survival Food From History – The Prepper Dome | June 13, 2016
|
Pingback:10 Ways Preppers Can Reuse Old Light Bulbs | | disasterdefense.us | July 21, 2016
|