Do you remember the holy trinity of survival? Food, water, shelter: does that ring a bell? Also, do you know the rule of threes? You can survive for 3 minutes without oxygen, for 3 days without water and for 3 weeks without food.
Well, how about hypothermia? Do you have any idea how long will you last out there in the cold during a wintertime apocalypse?
The thing is that in an extremely cold environment, if you cannot find or you cannot build an emergency shelter, you’ll die from exposure in a matter of hours. It’s also worth noting that you’ll be totally incapacitated a long time before your actual death. Cold has this effect on people, you know.
In a winter outdoors survival situation, your worst enemies are frostbite and hypothermia along with other conditions like dehydration, but let’s concentrate upon what will kill you first.
Besides wearing the proper (layered) clothing, knowing how to build a snow shelter in an emergency situation in order to maintain a proper body temperature should be mandatory for any outdoors enthusiast.
Winter presents many survival challenges but also a lot of lessons. Now is the time to practice unique survival skills.
CLICK HERE to subscribe to Survivopedia’s newsletter and get this month’s Free Report about how to practice your survival skills during winter.
The best thing about snow is that it makes for an excellent insulator. We’ve already talked about it in our article about how to insulate your homestead using snow during the cold winter months in order to save on your energy bill.
How To Build a Snow Shelter
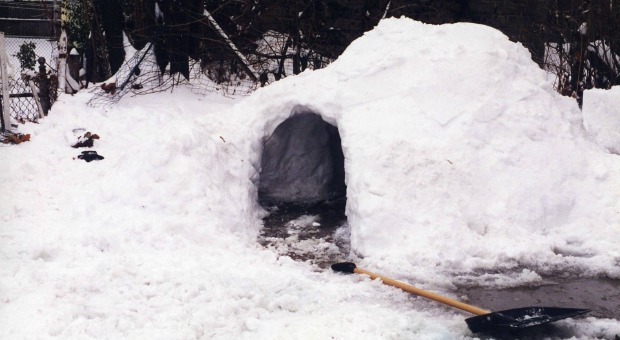
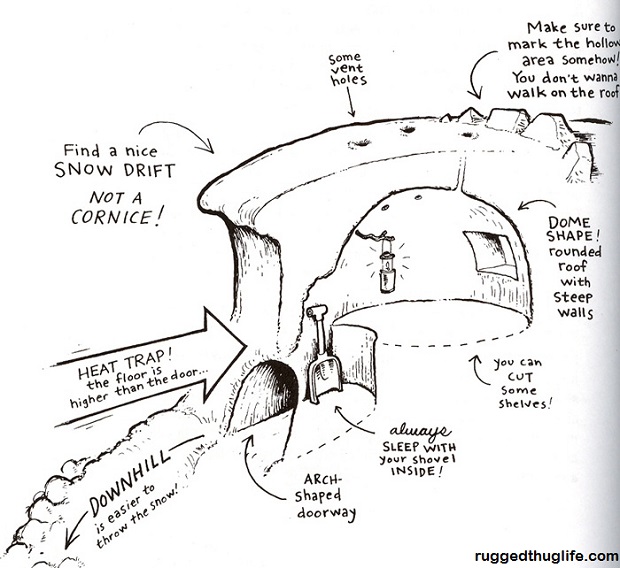
Snow can be used for building a survival shelter, also known as a quinzee, which is basically a large pile of snow, a mound of sorts, that has been hollowed out, thus making for a cave-like place to rest, sleep, keep yourself alive and so on and so forth.
Basically, a quinzee is a man-made snow cave inspired most probably from what dogs and wolves do when a blizzard’s coming their way: i.e. they dig a hole in the snow and they wait for the storm to pass.
The thing is, for building a quinzee you’ll definitely require a snow shovel or something similar, as you’ll have to move around and dig out a lot of snow.
The best design in an emergency survival scenario, especially if you’re out there alone and you lack basic tools, is the snow trench shelter which is easier to build using just your hands. To begin with, you should be aware of 2 main things:
- First, practice makes perfect. Therefore, you should practice building a snow shelter in your backyard using meager means for as long as it takes. Don’t use snow blowers and high-tech stuff. That’s cheating. I am talking about acquiring the skills first because theoretical knowledge alone won’t save your life in a survival scenario; it’s just not enough.
- Second, while practicing DIY-ing a snow shelter, you’ll realize the amount of effort and elbow grease that it takes for piling and packing snow, then removing some of it for just a one-person space.
Even if it’s 10 degrees outside, you’ll be breaking a sweat constantly, and that’s particularly dangerous from multiple points of view in a real life winter survival scenario, because of the risk of dehydration and hypothermia, not to mention exhaustion.
Most experts agree that building a snow shelter is not a feasible endeavor for just one person, especially if you try to do it in a hurry and you lack basic tools (like a shovel), so fair warning. However, it’s also very true that when confronted with imminent death, humans actually gain superpowers in the form of adrenaline kicks, hence you might have a chance after all, so don’t despair just yet.
Another thing to remember is to never travel alone, even if we’re talking about short distances. You can easily get lost in a blizzard and find yourself in a world of pain.
Now, the equipment you have at your disposal and the environment will determine the type of snow shelter you can build: a quinzee or a snow trench.
Step 1. Find a proper location
As usual, location is everything, so before starting digging, you should select the proper spot for your snow shelter. Always avoid windy slopes and areas of rockfall. In other words, never dig your snow shelter in the path of a potential rockfall or avalanche.
Also, if you’re building on a windy slope, where the wind blows against your shelter, is very dangerous as snow can easily clog the entrance of your shelter overnight when you’re sleeping, thus preventing fresh air to get inside. You know what happens with asphyxia, right? In short, you’ll be dead without even knowing it.
Step 2: Find an are with deep snow
Next, try to find an area with deep snow, thus saving a lot of work. Ideally, you should look for a snowdrift that’s at least 5 feet deep. The consistency of the snow is another factor, as fresh snow tends to be powdery, thus pretty difficult to work with because it’s prone to collapsing when you’re trying to make a cave.
The good news is that once disturbed, snow tends to harden, so if time is on your side, you should pile it up and wait for nature to take its course.
So, considering that you’ve already determined the size of the snow shelter you want to build and you’ve located the sweet spot for it, you should begin with stomping out the diameter of the snow shelter (a quinzee in this particular case) while wearing snow-shoes (provided you have them) thus packing the interior down.
In this way, you’ll create a strong platform upon which to build your snow shelter by eliminating layers in the snow.
Video first seen on OutsideFun1.
Step 3: Pile up the snow
Now it’s time to start piling up the snow, assuming you have a shovel. As I already warned you, this may take a while, especially if you want to let the mound set up for a few hours, during which you may start building a fire, take a bite to eat while you wait, etc.
This wait time is essential when building a quinzee, as it allows for sintering to kick in. Sintering is a fancy word which depicts the energy released by snow while moving inside the mound you’ve created, making for the snow crystals to bond together, thus acquiring structural integrity.
Basically, sintering prevents the cave from collapsing over you while you’re sleeping inside; that’s the lesson to be taken home.
Step 4: Dig a tunnel into the snow pile
Now, provided your mound has firmed up, you have to start digging your hole and you should begin with punching a few sticks (a foot long) through the mound, as they’ll serve as guides while you dig up your slumber chamber.
In the next phase, you’ll start digging the entry tunnel. You can plan on spending 2 or 3 hours digging the chamber area.
You can use tarps, pans or snow shoes to scoop out/remove the snow that resulted from digging. When you’ve reached your guide sticks, stop digging.
The ideal wall thickness is about 10 inches, so keep that in mind when designing your quinzee and putting your thickness markers in. Always remember to punch a few fist-size holes to let fresh air in.
How To Build a Snow Trench Survival Shelter
If the quinzee is not an option because you don’t have the time, the energy, the tools or none of the above (or you’re alone), you must go for a snow trench instead.
Video first seen on Snowy Range Survival.
In an emergency survival scenario, the best alternative is to dig a trench in the snow and use a tarp or something similar (wood branches covered with snow for example) as a roof of sorts.
You can use tree branches or ski poles to prop the tarp up. Snow tranches are easier and faster to dig, but they’ll lack both the comfort and the warmth of a proper-made quinzee. Also, you can be buried in case of a heavy snowstorm, so keep that in mind too.
As for my final words: if you’re the outdoors type and you’re roaming in the wild during the winter on a regular basis, always make sure you have the proper clothing and equipment that you’ll require in a survival scenario, including a compact snow shovel and never travel alone.
Think about our ancestors, how they survived during the biggest winters in history and what mistakes they did – you don’t want to repeat them, trust me!
If you’ve ever built a snow shelter or have any questions, please share them with us in the comment section below.
This article has been written by Chris Black for Survivopedia.





DR. JUDY AHRING | December 8, 2016
|
Thank you for putting this in read form. I AM SICK OF VIDEOS WHICH WASTE A LOT OF TIME.
Sideliner 1950 | December 9, 2016
|
Awesome video, despite the required investment of 5:28. You’ve inspired me to CONSIDER trying that — at home…maybe…someday. I’ve never done anything remotely like that, except for the one igloo I built as a kid, with a lot of help from dad.
Good article, good job. Might save a life.
Only thing I might have done differently would be to back into your parking spot; not really sure why, just seems like the right thing to do.
Pingback:12 Ways To Build A Survival Tent | Survivopedia | May 29, 2017
|
Pingback:Winter Survival: How To Start A Fire In The Snow | Survivopedia | December 7, 2017
|
Pingback:Survival Skills To Learn From Prehistoric People | Survivopedia | February 12, 2018
|