To grow a garden, whether indoors or outdoors, you essentially need three things besides seeds or seedlings: soil, water, and sunlight. While water and sunlight are easy to source, good-quality soil is often a challenge for many gardeners. Soil is more than just dirt—it must have specific qualities for your plants to grow and thrive.
Whether you’re an experienced gardener looking to deepen your knowledge of your garden soil or a newcomer curious about a freshly prepared plot, there are several ways to test your soil. Many of these methods are either free or low-cost, and even the most complex option—a detailed lab soil analysis—tends to be quite affordable.
Earn Your Food Independence NOW
If your gardening efforts have been successful so far, and you can blame failures only on factors like disease, insufficient sunlight, or inadequate watering, it means you’re one of the lucky ones and your soil is probably in good condition. Now, if some or all plants do not grow properly or fail to flourish, the soil might be the culprit.
How to make a soil analysis
While you can test the soil yourself for the first three factors, you will need some assistance for the fourth factor, which will involve certain costs.
Acidity or alkalinity
Knowing the pH of your garden soil, basically figuring out the acidic or alkaline levels, is super important for your plants. Most veggies do best in soil with a pH between 5.5 and 7.5, with 6.5 being the sweet spot. If your soil falls outside that range, your plants might have a tough time soaking up nutrients and could end up more susceptible to diseases. Thankfully, checking soil pH is pretty easy, but you’ll need a decent pH meter to get it right.
You can find affordable test kits at garden centers, usually for about $5 to $10. These kits typically involve scooping some soil into a test chamber, adding water and a special solution, and then comparing the color to a chart.
While pH test strips are also cheap and easy to find, they can be a bit tricky to read and might not give you super precise results. Most home gardeners can tell if their soil pH is in the ballpark, but for more accurate readings, a good quality pH meter is the way to go (which starts at around $50).
The good news is that you can also test the soil for free using the vinegar and baking soda method. So, here’s what you need to do:
Start by getting some white vinegar, baking soda, two small containers, and a small sample of soil.
Now, to test for Alkalinity take a small amount of soil and place it in one container. Add a few tablespoons of white vinegar. If it fizzes, your soil is alkaline (pH above 7).
To test for Acidity, in another container, take another small soil sample and add a few tablespoons of baking soda mixed with water. If it fizzes, your soil is acidic (pH below 7).
However, if neither reaction occurs, your soil is likely neutral (around pH 7).
Soil structure
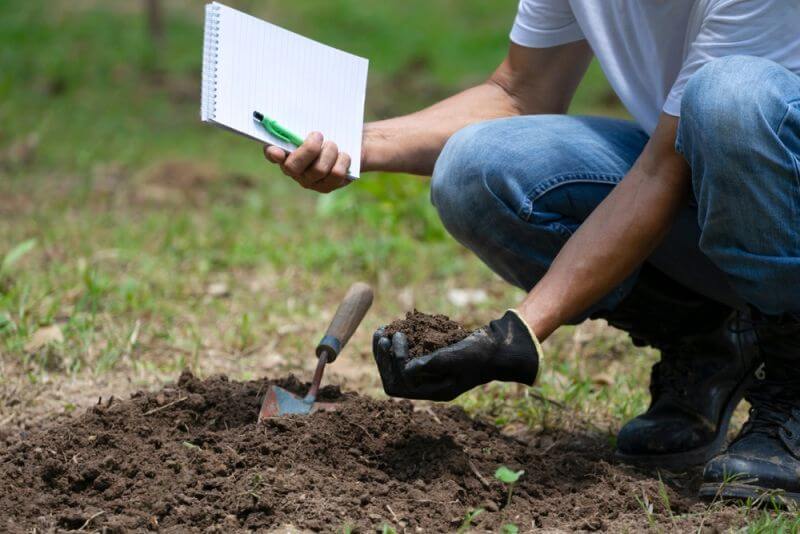
Soil is made up of three main components: clay, sand, and silt. If these are mixed together just right, you get loam, which is great for gardening because it’s rich and drains well. So, if you want to check your soil structure, below you will find two methods to do it.
For the first method which is the simplest one, you can grab a handful of moist (not dripping wet) soil and squeeze it into a ball.
Now open your hand and if the ball falls apart, you’ve got sandy soil.
If the ball holds its shape even when you poke it gently, you’ve got clay soil.
However, if the ball keeps its form and crumbles easily when gently poked, then you’ve got loamy soil, which is the soil you’re looking for.
Now, to get things even more interesting, you can try the Mason jar test. Here’s what you need to do:
Get a clean Mason Jar with a lid.
Collect a soil sample and fill the jar about one-third to halfway full. I recommend scraping off the top inch of soil and taking a sample from just below that, making sure to ditch any big rocks or organic bits like roots.
When you place the soil in the jar pour in enough water to fill the jar, leaving about half an inch to an inch of air space at the top. Screw on the lid and shake the jar really well for at least two minutes until everything is mixed up.
After shaking, let the jar sit without touching it and just wait. Sandy soils might settle in a few hours, while clay and silt-rich soils could take up to 48 hours to settle down. The longer you wait, the clearer the layers will be.
To figure out what type of soil you have, you need to do some layer measuring. The bottom layer is always sand (the heaviest particles), followed by silt, and the top layer will be clay (the lightest). Now measure the percentage of each layer and write it down. Ideally, your garden soil should have about 40% sand, 40% silt, and 20% clay.
If you spot some organic matter floating on the water’s surface that looks like peat, this means your soil is acidic. If you see white crystals at the bottom, that means your soil is alkaline.
With these tests, you can gather some pretty valuable insights about your garden soil.
Drainage
Testing the drainage of your gardening soil is a must because you will ensure that your plants will thrive. If proper drainage is not achieved and the water keeps pooling, it will lead to root rot and other issues. Here’s a simple method to test how well your soil drains:
You will need a shovel, water, and a timer or watch to do the drainage test.
Pick an area in your garden where you want to do the test and dig a hole about 10-12 inches deep and 10-12 inches wide. This size will give you a good indication of how well the surrounding soil drains.
Fill the hole with water and let it drain completely. This step helps saturate the soil, giving you a clearer picture of its drainage capabilities.
Once the water has drained, fill the hole again with water and start your timer. Measure how long it takes for the water to drain out completely.
Here’s how to read your measurements:
If the water drains in less than 1 hour, your soil has good drainage.
If it takes between 1 and 2 hours, the drainage is moderate or fair, but you might want to monitor it.
If it takes more than 2 hours for the water to drain, your soil has poor drainage and will require amendments to improve it.
Here’s what I also recommend:
Always check your garden after heavy rain, to spot areas where water pools. This is often a sign of moderate or poor drainage and you may want to improve the soil if it rains frequently in your region.
If you do notice poor drainage, it might be helpful to analyze your soil structure (as discussed earlier). Clay-heavy soils often have drainage issues, while sandy soils typically drain quickly.
Also, observe your plants and if you see signs of overwatering (like yellow leaves or wilting), it might be a clue that your soil drainage needs improvement.
If your soil does have drainage issues, you can take steps to improve it like adding organic matter (compost or manure) or incorporating coarse sand which can break clay soil.
Nutrients levels
If you want your plants to grow and thrive, you need to be aware of the nutrient content in the soil. While testing for every essential element at home can be quite complicated or near impossible unless you’re well-versed in chemistry it’s important to keep tabs on crucial macronutrients like nitrogen, phosphorus, and potassium (commonly referred to as NPK in fertilizers), along with calcium, magnesium, sulfur, and sodium.
Besides these macronutrients, certain micronutrients like boron, manganese, iron, zinc, and copper are also vital for the health of specific plants. Luckily, many laboratories offer soil testing services that assess these nutrients and include pH levels as well.
You can easily locate soil testing services through various sources such as your county extension office, nearby universities, local nurseries, and independent laboratories. A quick online search for “soil testing labs” will provide you with plenty of options, including lists of labs in your region.
Most lab websites outline the tests they conduct and often share sample result sheets. Just keep in mind that some labs focus mainly on farmers and might not accept small sample sizes, whereas university extensions usually accommodate home gardeners. Also, the cost of these tests varies depending on the service provider, with basic tests starting at around $10.
You will need a clean container and a way to send the sample (usually by mail). Now collect samples from various areas in your garden and combine them.
Follow the lab’s instructions for preparing and packaging the sample. Make sure to include any necessary forms and payment.
Once the lab tests your soil, they’ll provide a detailed report on nutrient levels, pH, and also recommendations for various amendments if needed.
Concluding
Soil testing is a vital step for anyone passionate about gardening, regardless of past successes. Soil can change over time due to factors like weather, plant growth, and the addition of fertilizers or amendments. What worked well in previous seasons might not yield the same results today. So don’t skip these essential steps outlined in today’s article if you want your garden to flourish.


radar | March 7, 2025
|
Garden Plants also need vitamins; and as Bob said, minerals. If the reader has “old expired” multi-vitamins around, those capsules can be opened with the powder released, or crushed, and diluted in water and sprayed or squirted between Garden plants (the roots grow between the plants) and will probably grow faster, thicker, and taller than plants not treated with vitamins. I have bought commercial garden vitamins and found my conclusion to be accurate. On the other hand, if you are healthy and if you take vitamins and minerals, you can collect your own urea (pee) and use 9 parts water to 1 part urea and spray or squirt the same NOT ON THE PLANTS, but in the soil in-between plants (where the roots grow longest (at least in my garden). Don’t forget that in the mid-west USA at certain times of year (often after a growing season, but sometimes a few months before seed planting, the whole rural area will smell like “fermented cow urea and poop”. This restores vitamins and minerals from food sources back into the soil. Heck, the birds do it, the urban animals (dogs, cats, squirrels, rabbits and birds do it); so why would health people not give it a try. Your old outdated multi-vitamins can do it also.. It is best to try it out to a small section of your garden area and compare “treated areas (and flavor of fruits”, to untreated areas.